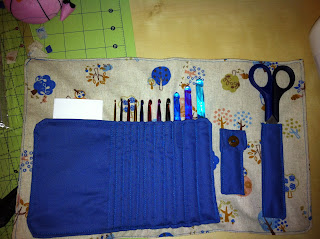
Hey guys! Yay it's finished! Soooo below I'll post the way I did it in case anyone else would like to make it. (sorry about the pictures they were all taken with my I phone)
Materials:
-one fat quarter of a fabric that you like for the main piece
-a fat quarter or even scraps of another color (mine is a heavier weight quilting cotton)
-coordinating thread
-a button
-and the normal sewing tools, scissors, a sewing machine, a buttonhole foot would be useful...etc.
Okay so first, at least what I did was lay out everything on top of the fat quarter to see how I kind of wanted it to be laid out.
Then I cut the fat quarter into two equal rectangles, which ended up equaling about 15.5"x10"
 |
| this was supposed to be the two 5"x2" but I cut it on the fold so that's why it's just a strip |
Now start assembling the little pieces. Sew all equal pieces right sides together, leave an opening, turn right side out and then edge stitch all around to close up the opening. Make sense? Okay, do that with all of the pieces.Also, I used a 3/8" seam allowance for everything. If you want a bigger one, you just need to accommodate that with the size of the pieces you cut.
With the 2"x3" pieces, after they are sewn, and edge stitched you need to sew a buttonhole. This will be the closing flap for the 2"x4" pieces (a little pocket for yarn needles).Once you do that, sew the button onto the pocket part. (I forgot to take pictures of that but it seems pretty self explanatory. =) )
Next, once all of the littler pieces are assembled lay them out on one of the 15.5"x10" rectangles. Decide where you want everything to go. Pin, and stitch around over the previous edge stitching on three sides only, not the top.. Do this for the 10"x6" rectangle as well.
Okay, here comes the part that I was dreading, and guess what-it wasn't bad at all. After the 10"x6" rectangle is sewn on the three sides to the backing fabric, we need to start sewing the lines to separate the needles and keep them organized. I started with the largest hook, N. Simply place the hook into the pocket with the "hook" part sticking out of the top. Push it with your finger towards the closed edge to make it snug and then pin on the other side. Remove the crochet hook and then sew in a straight line to the bottom edge, lift your presser foot, spin the fabric around, and sew up the line you just sewed.
Continue this process with all of the crochet hooks you have, one after the other. I liked to check after each line to make sure the crochet hooks were fitting right. Oh also, a little tip, you know how crochet hooks have little flatter parts for the thumb? Well, I call them a thumb grip. Anyway, pin on the side on the thumb grip, not higher or lower. The thumb grips are a little wider than the rest of the hook, so you want to make sure you accommodate for that. Do as I say not as I do in the picture with the pin in it =), that hook is a little bit too snug because I didn't follow my own instructions.
Once you finish with all of that, remove all of the crochet hooks, and whatever else you put in there haha, and take the other 15.5"x10" piece of fabric that you cut earlier.. Sew the two rectangles, right sides together, leaving an opening big enough to turn it right side out. Don't forget to clip your corners!
Turn it right side out and edge stitch all the way around to close up the opening. At this point you can decide how you want to officially close it, or of you want to fold it or roll it. I considered a big button, velcro, or just a tie. For now, I chose just to use a pretty blue ribbon, because it makes me happy. =)
I hope you enjoyed this tutorial. If you have any questions or constructive criticism please let me know, I'd be happy to hear from you!


2 comments:
Wow, Kayla, You are remarkable!
thanks!
Post a Comment